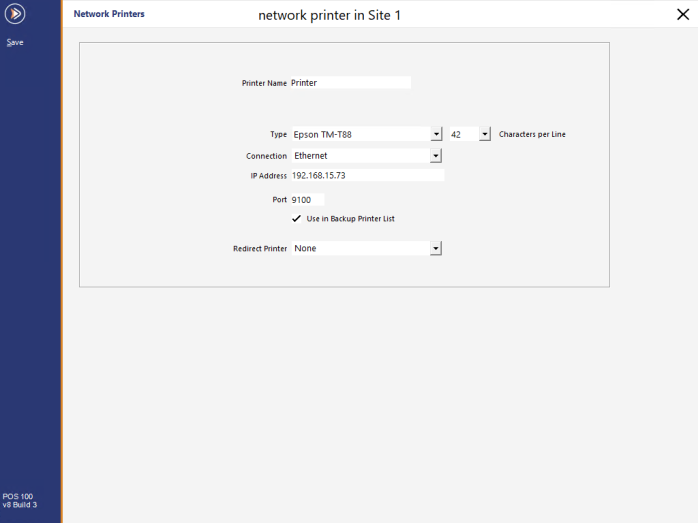
Press the ‘Add’ button located in the middle of the top of the screen.
A new window will open to enter the printer’s details.
Each printer must be given a unique name.
This will help distinguish printers from multiple terminals.
Use the drop-down menu to select from the available drivers.
Use the drop-down menu to select the maximum number of Characters per Line.
Many older printers support 42 Characters per Line, whereas some newer printers may have the ability to support 48 Characters per Line.
Use the drop-down menu to select from Ethernet, COM Port or USB.
This field will display when you have selected a COM Port as a connection.
Use the drop-down menu to select from the available speeds.
Baud Rate is the speed with which the printer communicates to the terminal.
You can find out the printer Baud Rate by running a Self-Test on the printer.
The Baud Rate is usually 9600 or 19200.
This field will display when you have selected a COM Port as a connection.
Use the ‘>’ button to select the POS Terminal the printer is connected directly to.
This field will display when you have selected Ethernet as a connection.
Enter the IP Address of the printer into this field.
This field will display when using Ethernet as a connection.
This is the default port used to communicate with the printers.
Do not change this setting unless advised of a new port number by your network administrator.
When this option is selected, the printer will display as an option on the screen at a terminal when the default printer has failed to print the job.
Use the drop-down menu to select a printer to be used automatically if the default printer fails.
Each printer can be set with a redirect printer, but if all printers are offline, the print job will loop until a printer becomes available, with no print jobs being printed.
All printers that have been added will be displayed in the list.
If you are using multiple Sites, printers will only display for one site at a time.
Important Notes: